Using an A15 automatic biochemical analyzer will give you a number of advantages over the use of a semi-automatic:
There are major differences when it comes to the quality that LEDs offer. HEINE has set a new standard which maintains that only the best is good enough, from the selection of materials to processing, from light intensity to dimmability, and from thermal management to a colour rendering index as high as possible.That’s what we call LED in HEINE Quality – or LED HQ.
See the difference for yourself when using a HEINE LED instrument. See the colours as they are during each examination.

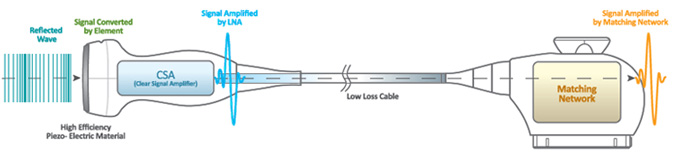
A transducer converts a signal in one form of energy to another form of energy. A transducer transmits and receives reflected ultrasound signals that are the primary data source for the creation of ultrasound images. Proprietary transducer technology yields superior clinical ultrasound imaging.

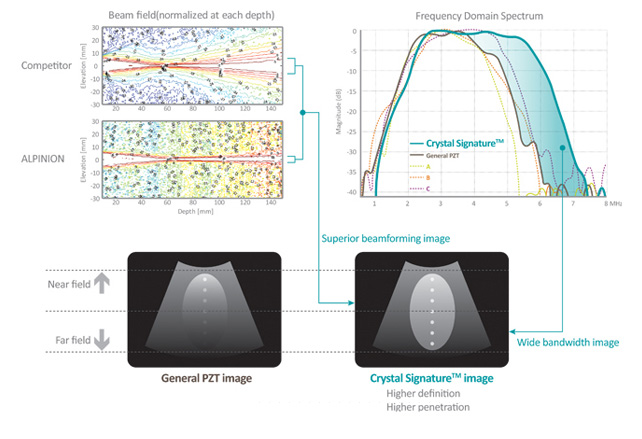
ALPINION’s transducer portfolio includes conventional piezo-ceramic,composite PZT and the latest single crystal materials. Single crystal material produces broadband frequency response and higher sensitivity, permitting its use in harmonic imaging with minimal loss of the acoustic signal. It results in more uniform wide-bandwidth imaging and thus offers higher resolution images to the user.
ALPINION has overcome the historic engineering and application limitations in the processing of delicate and expensive single crystal transducer materials through a unique and proprietary fabrication process. With ALPINION’s high performance single crystal transducer, users acquire broadband images with unparalleled sensitivity.
Through a unique and innovative single crystal transducer processing technology, ALPINION has produced the largest single crystal convex transducer ever fabricated, and the world’s first 3D/4D transducer made with single crystal material.
A single crystal transducer is characterized by a higher energy conversion efficiency and higher sensitivity than conventional piezo-ceramic materials; consequently, single crystal transducers can produce greater uniformity, and stronger penetration.
The attention to ergonomic design extends to the flexible cable and lightweight handle that are standard on all ALPINION transducer products.
Driven by customer requirements, ALPINION has accomplished the following:
• Ergonomic Transducer design with a flexible cable supports pain-free wrist manipulation when imaging.
• LabelingFluorescent labels on the transducer enable users to identity the transducer ID easily under subdued lighting conditions.
• 3D/4D transducersLightweight 3D/4D transducers with improved detail accuracy by overcoming size limitation and manufacturing difficulties.
Crystal Signature™ is characterized by much higher energy conversion efficiency than conventional piezo-ceramic materials, yielding greater uniformity and sensitivity. When combined with unique manufacturing processes, our proprietary Crystal Signature™ technology gives better images while decreasing production costs.
MicroFit™ Technology has resulted in smaller and lightweight transducers with better ergonomics that reduce operator fatigue.
Special attention is paid to the transducer cable, which is the lightest and most flexible in the ultrasound industry, further reducing the strain on the operator. Image quality is preserved under all conditions with the tough and robust connectors, which utilize the latest micro-pinless interconnect technology.
SensitiView™ Technology
The CSA™ generates an enriched purified signal with active electronics from high quality piezo-electric materials.
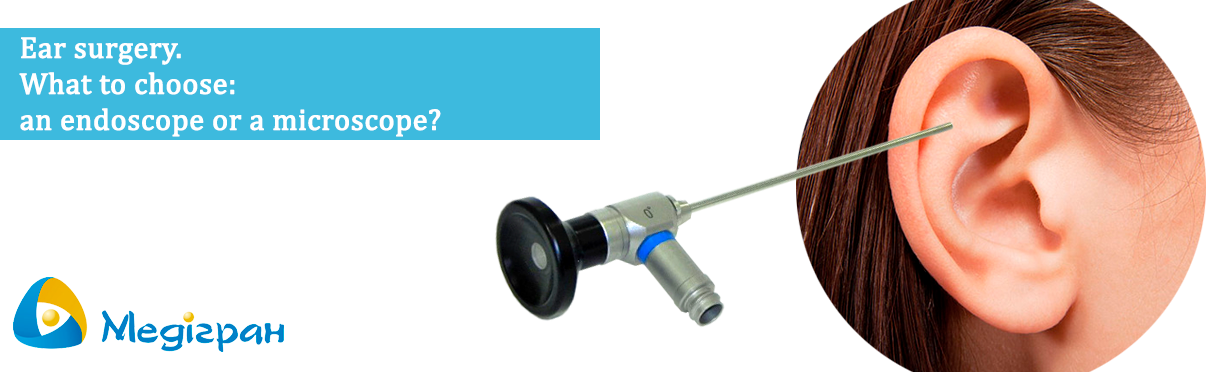
Endoscopic ear surgery is the latest technique for performing surgical interventions on the hearing organs and is being actively introduced throughout the world. In some cases, endoscopic ear surgery may result in a less invasive operation that can be performed entirely through the ear canal. The endoscope is one of two tools surgeons can use to see well during ear surgery. The other tool is a specialized microscope.
Microscopes have been used in otology for over seventy years. They make structures appear larger and have a very bright light. Surgical microscopes are large devices, weighing hundreds of pounds. The lens of the microscope needs to be about a foot away from the object (or target) the surgeon is looking at. As a result, other structures between the target and the lens can block the view. To overcome blocked views, surgeons sometimes need to make a larger incision (for example behind the ear canal) or drill away bone.
An endoscope is another type of device that can help surgeons see during surgery. It is shaped like a narrow tube and the lens is at the tip. The lens can be placed extremely close to the target, less than half an inch (or thirty times closer than with the microscope). This allows a very detailed view. Because the endoscope is so narrow, it can be slid past blocking structures. The endoscope also provides a wide panoramic view, whereas the microscope provides a narrower view.
Despite all the advantages and disadvantages, endoscopy is a new technology for surgical interventions, which is actively developing around the world. The German company MGB is actively working to create high-quality optics with a minimum diameter of the optical tube. A wide range of video lenses and a powerful light source help to accurately visualize the place of intervention. Choosing the endoscopic equipment of the MGB company, you choose the quality and reliability confirmed by more than 100 years of experience.
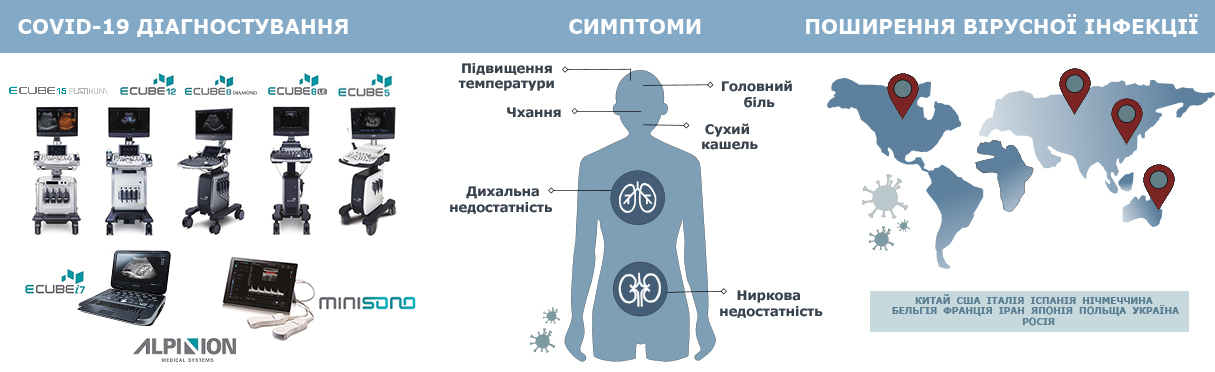
Cleaning and disinfection of ultrasonic transducers is a thorough and very important process in the operation of an ultrasonic device. So, in today's realities, in the context of the global outbreak of COVID-19, this process must be treated with extreme caution and response.
All ALPINION transducers require gentle care, cleaning and use. Extended manufacturer's recommendations are at the user manual, but we briefly recall the main thing.
This information is intended to increase user awareness of the risks of disease transmission associated with using this equipment and provide guidance in making decisions directly affecting the safety of the patient as well as the equipment user.
Diagnostic ultrasound systems utilize ultrasound energy that must be coupled to the patient by direct physical contact. Depending on the type of examination, this contact occurs with a variety of tissues ranging from intact skin in a routine exam to recirculating blood in a surgical procedure. The level of risk of infection varies greatly with the type of contact. One of the most effective ways to prevent transmission between patients is with single use or disposable devices. However, ultrasound transducers are complex and expensive devices that must be reused between patients. It is very important, therefore, to minimize the risk of disease transmission by using barriers and through proper processing between patients.
Using an inappropriate cleaning or disinfecting agent may damage the product. Cleaning products should be as close to neutral pH as possible. Any gel, cleaning or disinfectant products containing surfactants, methanol, ethanol, benzyl or methyl alcohol, bleach, methyl or ethyl paraben, polyethylene glycol, mineral oil, lubricant oil, oil based lotions, acetone, ammonia, anhydrous ammonia, iodine, iodine compounds, acids with pH5 or greater may damage or discolor your transducer.
To view recommended products from the manufacturer, see the table “Transducer Disinfectant Material Compatibility Table” list of approved products for cleaning and disinfecting ALPINION ultrasonic transducers.
What is the cleaning, disinfection and sterilization of ultrasound equipment?
Cleaning, disinfection and sterilization is a statistical decrease in the number of microbes on the surface, rather than their complete removal. As defined by the Centers for Disease Control and Prevention (CDC) [1]:
Cleaning is the removal of visible soil (eg, organic and inorganic material) from objects and surfaces and normally is accomplished manually or mechanically using water with detergents or enzymatic products.
Thorough cleaning is essential before high-level disinfection and sterilization because inorganic and organic material that remains on the surfaces of instruments interfere with the effectiveness of these processes.
Meticulous cleaning of the instrument is the key to an initial reduction of the microbial/organic load by at least 99%.1 This cleaning is followed by a disinfecting procedure to ensure a high degree of protection from infectious disease transmission, even if a disposable barrier covers the instrument during use.
The American Institute of Ultrasound in Medicine [2] and the CDC describe several levels of disinfection and sterilization:
Disinfection describes a process that eliminates many or all pathogenic microorganisms, except bacterial spores.
Low-Level Disinfection — destruction of most bacteria, some viruses, and some fungi. Low-level disinfection will not necessarily inactivate Mycobacterium tuberculosis or bacterial spores.
Mid-Level Disinfection — inactivation of M Tuberculosis, bacteria, most viruses, most fungi, and some bacterial spores.
High-Level Disinfection — destruction/removal of all microorganisms except bacterial spores.
Sterilization describes a process that destroys or eliminates all forms of microbial life and is carried out in healthcare facilities by physical or chemical methods. High-level sterilizers and disinfectants recommended by the U.S. Food and Drug Administration (FDA) [3] are listed in the table.
Sterilants and High-Level Disinfectants Listed by the FDA
| Name | Composition | Action |
| Glutaraldehyde | Organic compound (CH2(CH2CHO)2) | Induces cell death by cross-linking cellular proteins; usually used alone or mixed with formaldehyde |
| Hydrogen peroxide | Inorganic compound (H2O2) | Antiseptic and antibacterial; a very strong oxidizer with oxidation potential of 1.8 V |
| Peracetic acid | Organic compound (CH3CO3H) | Antimicrobial agent (high oxidation potential) |
| Ortho-phthalaldehyde | Organic compound (C6H4(CHO)2) | Strong binding to outer cell wall of contaminant organisms |
| Hypochlorite/hypochlorous acid | Inorganic compound (HClO) | Myeloperoxidase-mediated peroxidation of chloride ions |
| Phenol/phenolate | Organic compound (C6H5OH) | Antiseptic |
| Hibidil | Chlorhexidine gluconate (C22H30Cl2N10) | Chemical antiseptic |
Step 1: Cleaning the transducer
Cleaning is an important procedure that is carried out before disinfecting the transducer. The transducer must be cleaned after each use.
1) Disconnect the transducer from the system.
2) Moisten a clean gauze pad with purified water and wipe the transducer to remove any gel or particles remaining on the transducer. If purified water is not effective, then you can use an approved pre-cleaner or low-level disinfectant (more here).
3) Carefully wipe the entire transducer, including the cable and connector. When cleaning the connector, do not allow any type of fluid to enter through the connector strain relief, electrical contacts or areas surrounding the locking-lever shaft and the strain relief.
4) To remove remaining particulate and cleaning residue, use cleaning wipes according to the manufacturers’ instructions, or rinse thoroughly with water up to the immersion point. Do not immerse the connector, connector strain relief, or cable that is within 5 cm of the connector strain relief.
5) Dry the transducer using a sterile cloth or gauze after rinsing. Do not dry the transducer by heating it.
6) Examine the housing, strain relief, lens and seal for damage, and check for any functional problem. If any damage is found, do not use a transducer and contact your ALPINION MEDICAL service engineer or an authorized agent.
Step 2: Disinfecting the transducer
To disinfect or high-level disinfect a transducer.
1) Disconnect the transducer from the system.
2) Thoroughly clean, rinse, and dry the transducer.
3) After cleaning, choose a high-level disinfection solution compatible with your transducer. If a pre-mixed solution is used, be sure to observe the solution expiration date.
4) Disinfect or high-level disinfect the transducer by following the disinfection method recommended by the disinfection solution manufacturer (more here).
5) Rinse the transducer with plenty of sterile water to remove all chemical residues on it. Or follow the rinsing method recommended by the disinfectant manufacturer to rinse the transducer.
6) Wipe off the water on the transducer with sterile cloth or gauze after rinsing it. Do not dry the transducer by heating.
7) Examine the housing, strain relief, lens and seal for damage, and check for any functional problem. If any damage is found, do not use a transducer and contact your ALPINION MEDICAL service engineer or an authorized agent.
Step 3: Sterilizing the transducer
Sterilization of endocavity transducers may be required in some countries. Alpinion Medical Systems’ endocavity transducers meet the relevant cleaning, disinfection, and sterilization requirements in accordance with provisions of the IEC 60529.
1) Before sterilization, the transducer must be cleaned. Thoroughly clean, rinse, and dry the transducer.
2) Choose a sterilization solution compatible with your transducer. For a list of approved sterilization solution (more here).
3) Sterilize the transducer by following the sterilization method recommended by the sterilization solution manufacturer.
4) Rinse the transducer with plenty of sterile water to remove all chemical residues on it. Or follow the rinsing method recommended by the sterilization solution manufacturer to rinse the transducer.
5) Wipe off the water on the transducer with sterile cloth or gauze after rinsing it. Do not dry the transducer by heating.
6) Examine the housing, strain relief, lens and seal for damage, and check for any functional problem. If any damage is found, do not.
Transducers immersion during cleaning,disinfection and sterilization
Transducers meet Ingress Protection IPX8 of EN 60529 and IEC 60529 tothe depth of the immersion line shown in the illustration only for transducerswith the “IPX8” symbol on the connector of the transducer/ 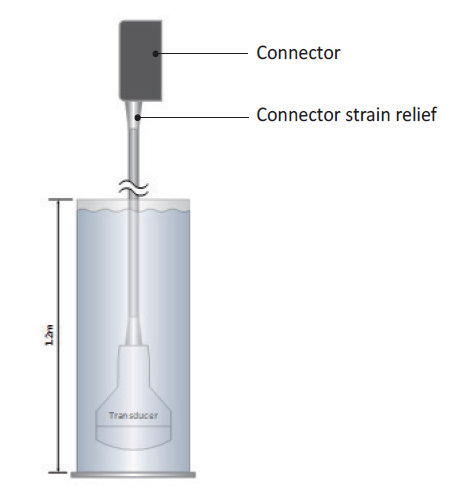
Figure. IPX8 immersion level
Worthknowing
To avoid damage to the transducer,observe the immersion levels indicated for each transducer type. Transducerswith the protection level IPX8 are indicated by the presence of the “IPX8”symbol on the connector of the transducer. Test Standard of IPX8: Immersion for90 minutes at a depth of 1 meter.
Remember, the more carefully youtreat ultrasonic equipment, the longer it will work for you.
P.S. We recommend that you familiarize yourselfwith the statement of the Safety Committee of the World Federation of Ultrasound Diagnostics in Medicine and Biology (WFUMB) on safe ultrasound examination and clean equipment in the context of COVID-19.
Reference:
1. «Guideline for Disinfection and Sterilization inHealthcare Facilities», 2008. The site of the Center for Disease Control:http://www.cdc.gov/hicpac/pdf /guidelines/Disinfection_Nov_2008.pdf
2. AIUM: Guidelines for Cleaning and PreparingExternal- and Internal-Use Ultrasound Transducers Between Patients, SafeHandling, and Use of Ultrasound Coupling Gel. The site of the AIUM:www.aium.org/accreditation/Guidelines_Cleaning_Preparing.pdf
3. FDA-Cleared Sterilants and High Level Disinfectantswith General Claims for Processing Reusable Medical and Dental Devices. Thesite of the FDA:https://www.fda.gov/medical-devices/reprocessing-reusable-medical-devices-information-manufacturers/fda-cleared-sterilants-and-high-level-disinfectants-general-claims-processing-reusable-medical-and
4. J.S. Abramowicz, J.M. Basseal, WFUMB PositionStatement: How toperform a safe ultrasound examination and clean equipment inthe context of COVID-19, Ultrasoundin Medicine and Biology (2020), doi:https://doi.org/10.1016/j.ultrasmedbio.2020.03.033
5. Abramowicz J.S., Basseal J. WFUMB PositionStatement: How to perform a safe ultrasound examination and clean equipment inthe context of COVID-19 (translation into Russian) // Ultrasound and FunctionalDiagnostics. 2020.No. 1. P. 12–23. DOI: 10.24835/1607-0771-2020-1-12-23. (Article in Russian)
For the safety of patients and healthcare providers fighting COVID-19, we provide the transducers cleaning & disinfection guideline. Please refer to the below and check the disinfectant material compatibility of your transducers.
Low-level disinfection
High-level disinfection
Do not dry the transducer by heating.
Download transducers disinfectant guide